Você já pode interagir em comunidade no Softwarelivre.org
Visite este endereço "http://softwarelivre.org/ "e participe


Busque imagens sob creative commons no flickr
http://flickrcc.bluemountains.net
Caso uma imagem esteja indisponível copie o identificador da imagem
tipo isto: www.flickr.com/photos/40221941@N00/1256180680
Caso uma imagem esteja indisponível copie o identificador da imagem
tipo isto: www.flickr.com/photos/40221941@N00/1256180680

Executando apenas um comando python no terminal
python -c'import math; print math.pi'
Cheguei a esta dica por causa desta thead no python brasil.
Para criar um arquivo contendo:
1)
2)
...
45)
python -c'open("arquivo.txt","w").writelines(["%d)\n"%x for x in
range(1,46)])'
Cheguei a esta dica por causa desta thead no python brasil.
Para criar um arquivo contendo:
1)
2)
...
45)
python -c'open("arquivo.txt","w").writelines(["%d)\n"%x for x in
range(1,46)])'
Postando mensagens no identi.ca usando o pidgin
O identi.ca é um serviço de micro blogging similar ao twitter só que é livre
Adicione antes o contato update@identi.ca depois clique em: http://identi.ca/settings/im
e configure o acesso por lá, em poucos instantes você recebe uma solicitação do identi.ca.
Fazendo esta configuração eu consigo postar no identi.ca até pelo gmail :)
Adicione antes o contato update@identi.ca depois clique em: http://identi.ca/settings/im
e configure o acesso por lá, em poucos instantes você recebe uma solicitação do identi.ca.
Fazendo esta configuração eu consigo postar no identi.ca até pelo gmail :)


Processando imagens em lote no gimp
Primeiro instale os pacotes necessários:
sudo apt-get install -y gimp-plugin-registry gimp-data-extras Agora abra o menu
Selecione as imagens que deseja modificar...

No nosso exemplo vamos converter para escala de cinza...

Para redimensionar

Site do projeto: http://members.ozemail.com.au/~hodsond/dbp.html
Extensão para fatiamento de svg diretamente para bitmaps
fonte: http://irukado.org/svgslice/
SVGSlice is a plugin for the vector graphics program, Inkscape, which allows a high-quality SVG image to be directly sliced into bitmap graphics for a website. It does this using Inkscape’s built-in layers and rectangles, so that you can visually draw where you want slicing to be done, directly from within the program. Essentially, it works a lot like the built-in slicing available in programs like Macromedia’s Fireworks, except that it’s Free Software, for your favourite Free Software vector graphics app.

SVGSlice is a plugin for the vector graphics program, Inkscape, which allows a high-quality SVG image to be directly sliced into bitmap graphics for a website. It does this using Inkscape’s built-in layers and rectangles, so that you can visually draw where you want slicing to be done, directly from within the program. Essentially, it works a lot like the built-in slicing available in programs like Macromedia’s Fireworks, except that it’s Free Software, for your favourite Free Software vector graphics app.
Screenshots

SVGSlice Screenshot
Download
Development
FontForge - Crie suas próprias fontes no linux
http://fontforge.sourceforge.net/
Como o tema da interface não é muito legal estou indicando um artigo que ensina como melhorar a mesma: http://my.opera.com/area42/blog/?startidx=20
Mirror: http://espelhos.edugraf.ufsc.br/ubuntu/pool/main/f/fontforge/
Como o tema da interface não é muito legal estou indicando um artigo que ensina como melhorar a mesma: http://my.opera.com/area42/blog/?startidx=20
Mirror: http://espelhos.edugraf.ufsc.br/ubuntu/pool/main/f/fontforge/
O que esperar do inkscape 0.47
A nova versão do inkscape, com previsão de lançamento para 15 de junho de 2009 terá muitas novidades, desta feita como sempre , o foco desta release é melhorar a legibilidade do código para permitir um desenvolvimento de longo prazo mais consistente e fácil de manter, entretanto muitas novidades virão, abaixo listei algumas das muitas novidade, mas se desejar ver tudo clique no link abaixo. :)
http://wiki.inkscape.org/wiki/index.php/ReleaseNotes047
Guides essa sugestão foi minha :)
http://wiki.inkscape.org/wiki/index.php/ReleaseNotes047
New effects
- Sketch: Simulates hand-drawn lines. A set of parameters lets you tune the effect. They are all summarized in this picture.

- Hatches Fills the given shape with rough, configurable and randomized hatches, simulating a quick hand drawing.
.

- von Koch: This effect creates fractal pictures. A collection of transformations (rotations, rescalings, etc...) is recursively applied to the input path. The transforms are derived from a "reference" path (a line segment) and a "generating" path (basically a collection of segments): the thransforms are the one needed to move the reference onto each segment of the generating path (components in the generating path having more than one segment might be used to define shearing/mirroring transforms). A famous example is the von Koch's snowflake.

- Warning: the complexity of the output path grows exponentially fast with the number of generations. As a guardrail, an (editable) complexity bound is provided, above which the effect is disabled.
- Knot: Creates a knot from a flat self intersecting curve. At each crossing, one string is interrupted to make it look like going under the other. The "sign" of each crossing can be set independantly.

UniConvertor-based import and export
Inkscape can now use UniConvertor to import files of the following types:
- Corel DRAW Compressed Exchange files (CCX)
- Corel DRAW 7-X4 document files (CDR)
- Corel DRAW 7-X4 Template files (CDT)
- Corel DRAW Presentation Exchange files (CMX)
- sK1 files (SK1)
- Computer Graphics Metafiles (CGM)
- Windows Metafiles (WMF)
Inkscape can now use UniConvertor to export files of the following types:
- Windows Metafiles (WMF)
- sK1 files (SK1)
Text objects are not supported as of UniConvertor 1.1.1.
On Windows, UniConvertor is included with Inkscape distribution and does not require separate installation.
Autosave
Autosave has now been added to allow for automatic timed backups as work goes on. Saved versions are put in a designated directory and do not overwrite the original SVG file and each other. Go to Inkscape Preferences, Autosave tab, to enable this feature and specify the backup time interval, the directory, and the maximum number of saved backups (if this number is exceeded, old backups will start to be deleted).
Guides essa sugestão foi minha :)
- Guides can now be rotated using the mouse. Each guide has an anchor that determines the point around which it rotates.
- There is now an option to treat groups as single objects during conversion to guides (as opposed to converting each object inside the group separately).
- Veja também o anúncio no site do inkscape brasil.
Manual do Softpedia: How to Install OpenOffice.org 3.1 on Ubuntu 9.04
Neste link:
http://news.softpedia.com/news/How-to-Install-OpenOffice-org-3-1-on-Ubuntu-9-04-111105.shtml
Você encontra um manual completo sobre como instalar o openoffice 3.1 no ubuntu 9.04
STEP 1 - Add the OpenOffice.org 3.1 repositories
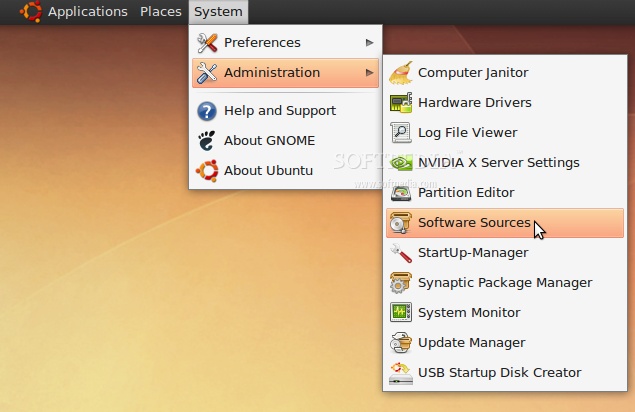
Go to System -> Administration -> Software Sources...
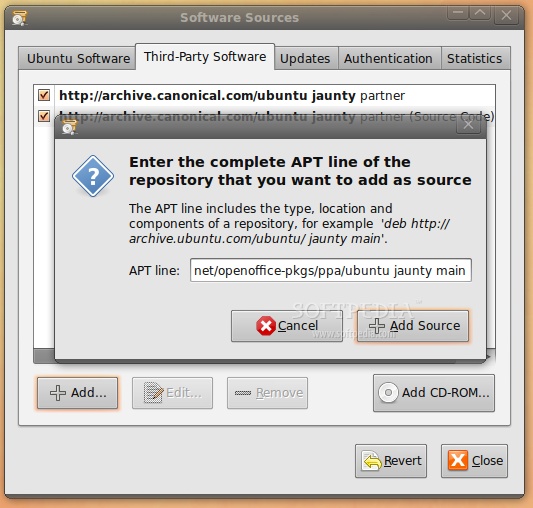
Enter your password. Go to the second tab, "Third-Party Software," click on the "Add" button, and paste the line below for your Ubuntu distribution...
For Ubuntu 8.04
deb http://ppa.launchpad.net/openoffice-pkgs/ppa/ubuntu hardy main
For Ubuntu 8.10
deb http://ppa.launchpad.net/openoffice-pkgs/ppa/ubuntu intrepid main
For Ubuntu 9.04
deb http://ppa.launchpad.net/openoffice-pkgs/ppa/ubuntu jaunty main
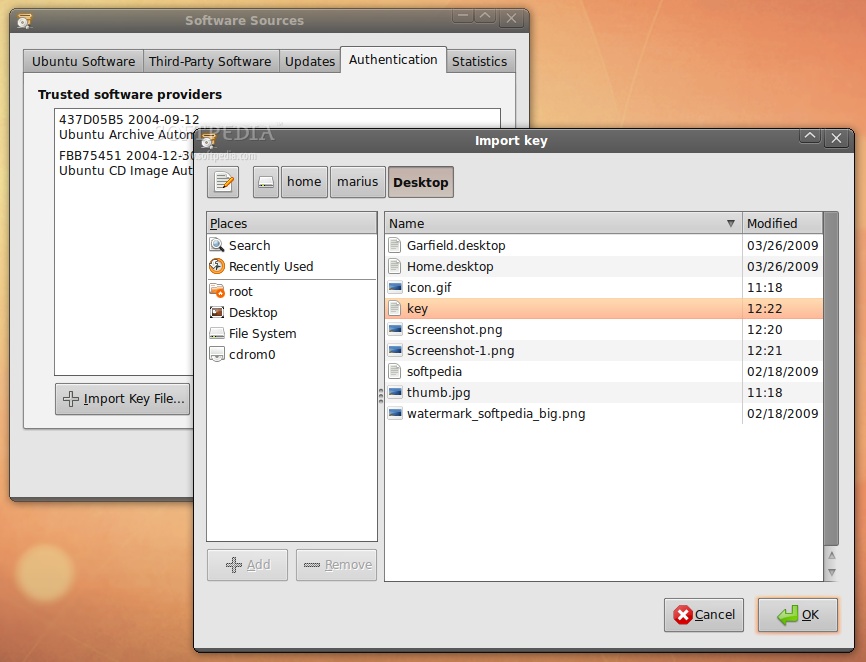
· Right click HERE and choose the "Save Link As..." options to save the key file on your desktop.
· Go to the fourth tab, "Authentication," click the "Import Key File" button, navigate to the location where you've just saved the key file (usually, it is File System/home/YOURUSERNAME/Desktop) and double click it. You will immediately see a new entry called "247D1CFF 2009-01-21 Launchpad PPA for OpenOffice.org Scribblers."
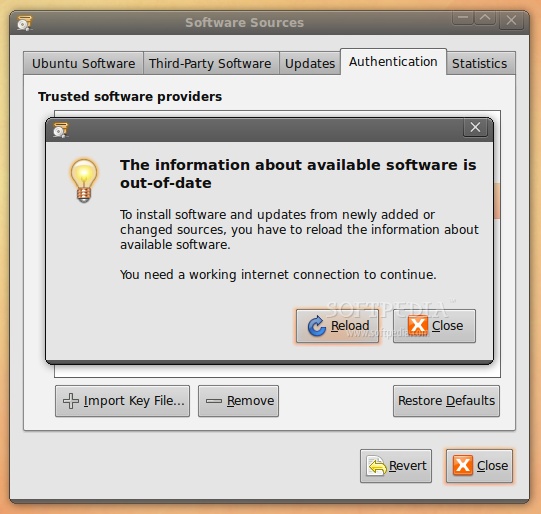
Now, click the “Close” button, then the “Reload” one and wait for the application to close!
STEP 2 - Remove the old OpenOffice 3.0
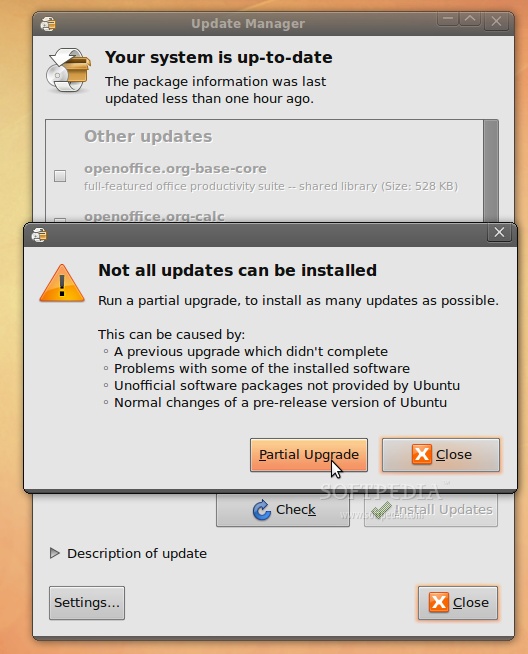
Go to System -> Administration -> Update Manager...
Let the Update Manager load the information about new software and click on the "Partial Upgrade" button when prompted...
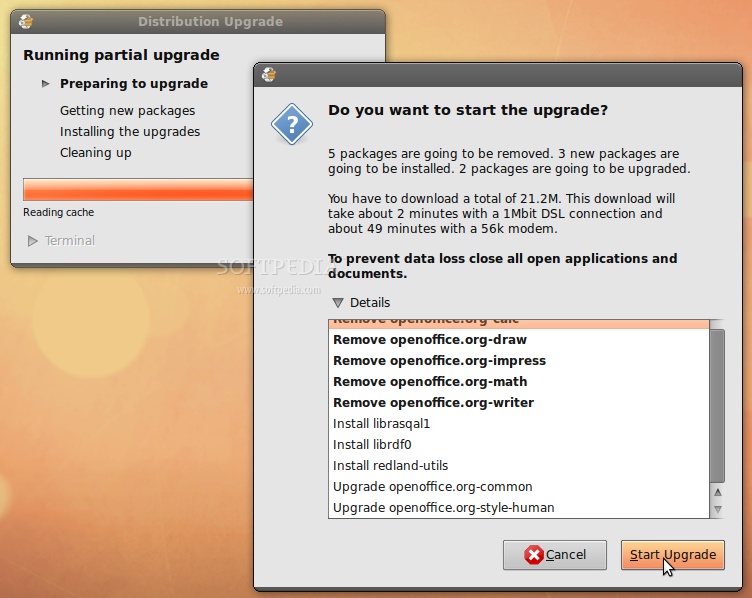
The partial upgrade will start and you will be asked to confirm the upgrade. Click on the "Start Upgrade" button...
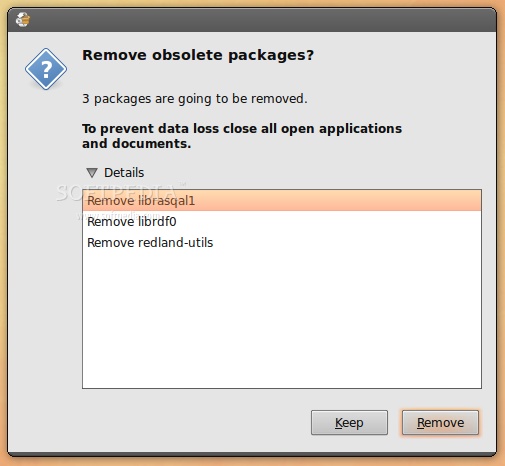
When asked to remove obsolete packages, click on the "Remove" button...
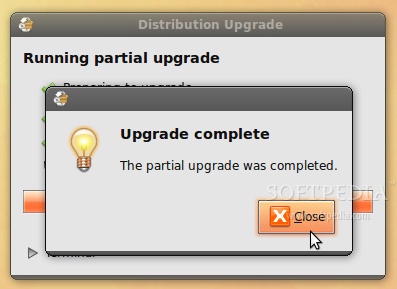
When the partial upgrade is done, click on the "Close" button to finish the removal process of the installed OpenOffice.org suite.
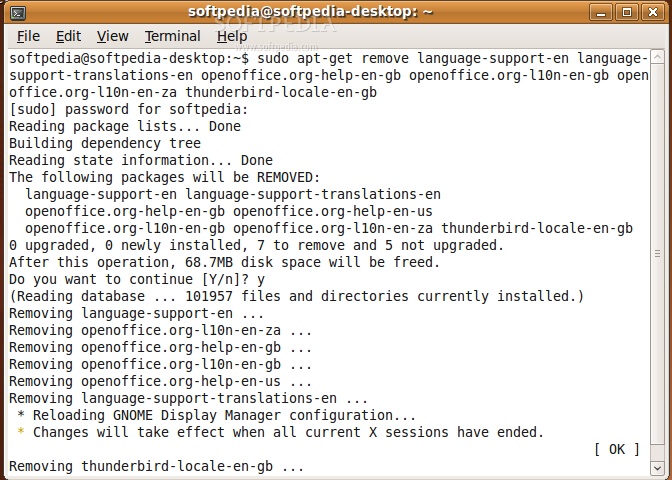
However, not all packages were removed, so you need to do it manually before installing the new OpenOffice.org 3.1. Open a terminal (Applications -> Accessories -> Terminal) and paste the following code:
sudo apt-get remove language-support-en language-support-translations-en openoffice.org-help-en-gb openoffice.org-l10n-en-gb openoffice.org-l10n-en-za thunderbird-locale-en-gb
Type Y when asked if you want to remove those packages. When it's done, close the terminal window.
STEP 3 - Install OpenOffice.org 3.1
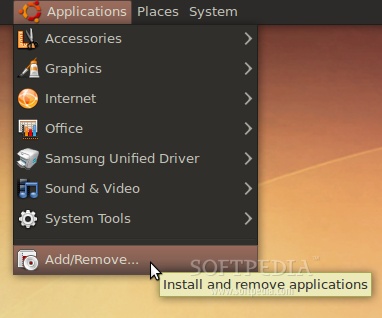
At this moment, you don't have any OpenOffice.org suite installed in your system. Therefore, go to Applications -> Add/Remove...
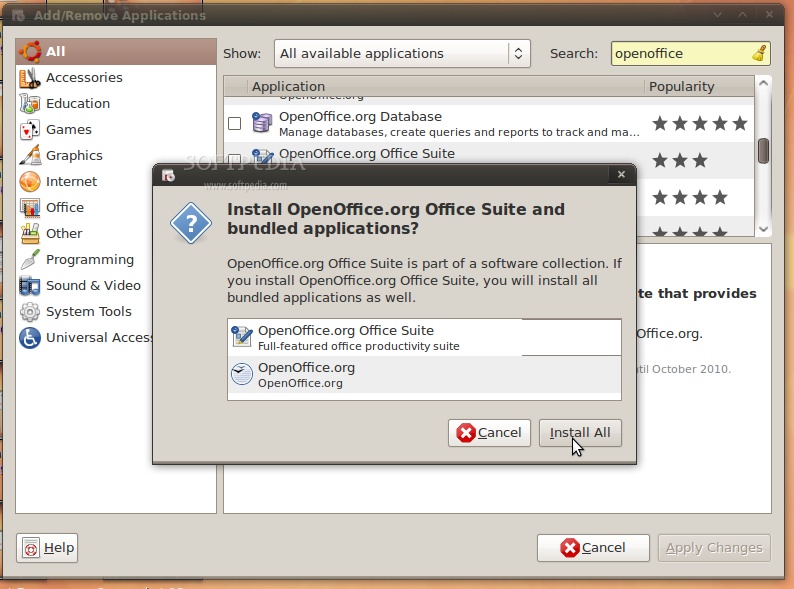
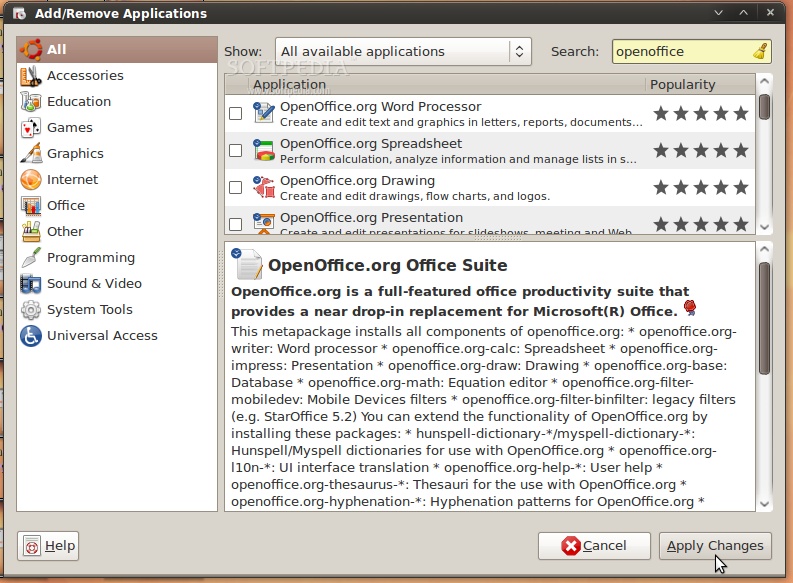
Select the "All availalbe applications" option from the "Show" drop-down menu and search for openoffice in the "Search" box. The OpenOffice.org Suite will be found... scroll down until you see it and click on the check box in front of it. Click the "Install All" button when asked if you want to install the OpenOffice.org Suite and bundled applications...
Now, click the "Apply Changes" button...
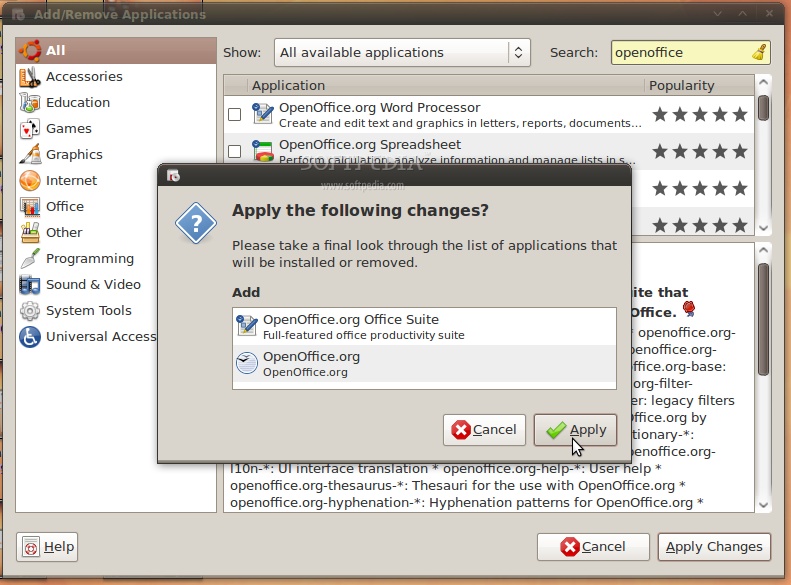
Then the "Apply" button...
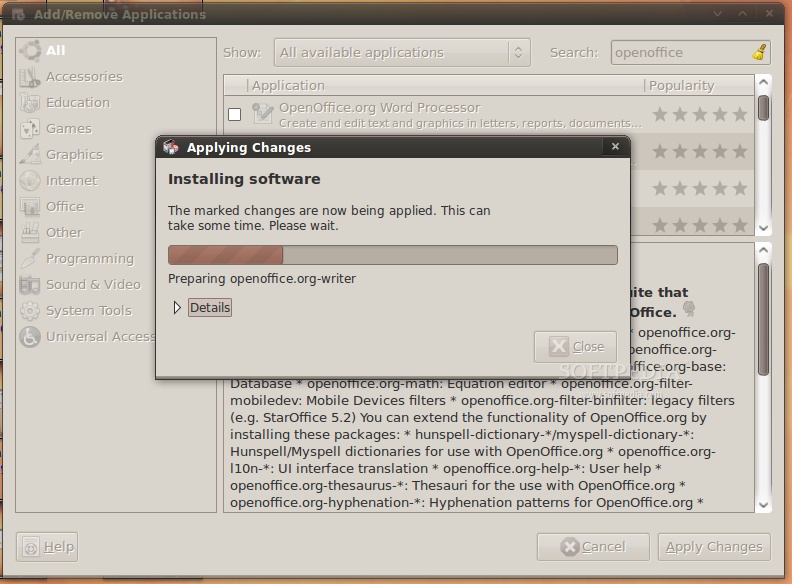
Wait for the installer to install the new OpenOffice.org packages....
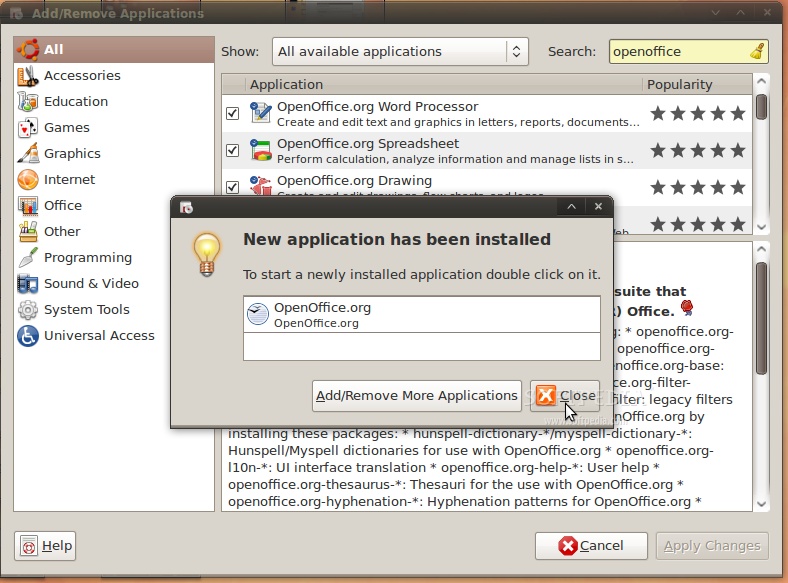
When the installation process is over, you will be notified. Click the "Close" button to close the Add/Remove software...
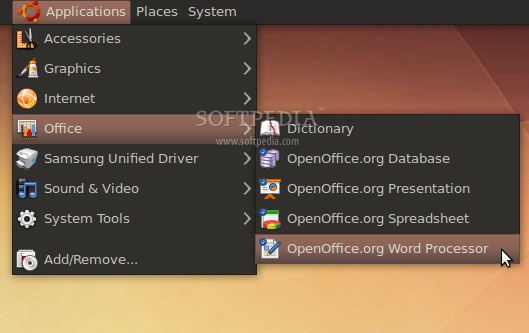
That's all, folks! Go to Applications -> Office and you can use your brand new OpenOffice.org 3.1 office suite.
And the best part is that your open source office suite will be up-to-date from now on. Take a look below at some shots of OpenOffice.org 3.1 in Ubuntu 9.04 (Jaunty Jackalope).
Credits: Special thanks go to Chris Cheney and the "OpenOffice.org Scribblers" team for creating the PPA for Ubuntu.
http://news.softpedia.com/news/How-to-Install-OpenOffice-org-3-1-on-Ubuntu-9-04-111105.shtml
Você encontra um manual completo sobre como instalar o openoffice 3.1 no ubuntu 9.04
STEP 1 - Add the OpenOffice.org 3.1 repositories
Go to System -> Administration -> Software Sources...
 |
Enter your password. Go to the second tab, "Third-Party Software," click on the "Add" button, and paste the line below for your Ubuntu distribution...
For Ubuntu 8.04
deb http://ppa.launchpad.net/openoffice-pkgs/ppa/ubuntu hardy main
For Ubuntu 8.10
deb http://ppa.launchpad.net/openoffice-pkgs/ppa/ubuntu intrepid main
For Ubuntu 9.04
deb http://ppa.launchpad.net/openoffice-pkgs/ppa/ubuntu jaunty main
 |
· Right click HERE and choose the "Save Link As..." options to save the key file on your desktop.
· Go to the fourth tab, "Authentication," click the "Import Key File" button, navigate to the location where you've just saved the key file (usually, it is File System/home/YOURUSERNAME/Desktop) and double click it. You will immediately see a new entry called "247D1CFF 2009-01-21 Launchpad PPA for OpenOffice.org Scribblers."
 |
Now, click the “Close” button, then the “Reload” one and wait for the application to close!
 |
STEP 2 - Remove the old OpenOffice 3.0
Go to System -> Administration -> Update Manager...
 |
Let the Update Manager load the information about new software and click on the "Partial Upgrade" button when prompted...
 |
The partial upgrade will start and you will be asked to confirm the upgrade. Click on the "Start Upgrade" button...
 |
When asked to remove obsolete packages, click on the "Remove" button...
 |
When the partial upgrade is done, click on the "Close" button to finish the removal process of the installed OpenOffice.org suite.
 |
However, not all packages were removed, so you need to do it manually before installing the new OpenOffice.org 3.1. Open a terminal (Applications -> Accessories -> Terminal) and paste the following code:
sudo apt-get remove language-support-en language-support-translations-en openoffice.org-help-en-gb openoffice.org-l10n-en-gb openoffice.org-l10n-en-za thunderbird-locale-en-gb
Type Y when asked if you want to remove those packages. When it's done, close the terminal window.
 |
STEP 3 - Install OpenOffice.org 3.1
At this moment, you don't have any OpenOffice.org suite installed in your system. Therefore, go to Applications -> Add/Remove...
 |
Select the "All availalbe applications" option from the "Show" drop-down menu and search for openoffice in the "Search" box. The OpenOffice.org Suite will be found... scroll down until you see it and click on the check box in front of it. Click the "Install All" button when asked if you want to install the OpenOffice.org Suite and bundled applications...
 |
Now, click the "Apply Changes" button...
 |
Then the "Apply" button...
 |
Wait for the installer to install the new OpenOffice.org packages....
 |
When the installation process is over, you will be notified. Click the "Close" button to close the Add/Remove software...
 |
That's all, folks! Go to Applications -> Office and you can use your brand new OpenOffice.org 3.1 office suite.
 |
And the best part is that your open source office suite will be up-to-date from now on. Take a look below at some shots of OpenOffice.org 3.1 in Ubuntu 9.04 (Jaunty Jackalope).
 |
 |
Credits: Special thanks go to Chris Cheney and the "OpenOffice.org Scribblers" team for creating the PPA for Ubuntu.
Uma forcinha para auxiliar a colocar o windows na lixeira
Muitas vezes você se dispõe a ajudar seu amigo a instalar o windows linux em dual boot, e não mais que derrepente o desfragmentador do windows deixa os tais "dados que não podem ser movidos" lá no final do disco, o que fazer então?
Instale o ultradefrag ele é gpl:
oferece opções avançadas como desfragmentação durante a inicialização, o que permite reorganizar também os arquivos de sistema, que não são movidos durante as desfragmentações tradicionais.
link: http://ultradefrag.sourceforge.net/
No script de boot use (seja paciente)
No meu caso só consegui remover os dados "que não podiam ser movidos" usando a opção de otimização no script. Outro detalhe não tente salvar usando outra codificação, aliás isto é comentado dentro do próprio script, tem que ser utf-16.
Leia o handbook:
http://ultradefrag.sourceforge.net/handbook/
Instale o ultradefrag ele é gpl:
oferece opções avançadas como desfragmentação durante a inicialização, o que permite reorganizar também os arquivos de sistema, que não são movidos durante as desfragmentações tradicionais.
link: http://ultradefrag.sourceforge.net/
No script de boot use (seja paciente)
No meu caso só consegui remover os dados "que não podiam ser movidos" usando a opção de otimização no script. Outro detalhe não tente salvar usando outra codificação, aliás isto é comentado dentro do próprio script, tem que ser utf-16.
udefrag -o c:

Leia o handbook:
http://ultradefrag.sourceforge.net/handbook/
Font Survey: 41 of the Best Monospaced Programming Fonts
Font Survey: 41 of the Best Monospaced Programming Fonts
Tem brinde :)
http://www.backpacker.gr/pages/fonts/fonts.asp

(Updated) BPmono (regular + italics + bold) | download (3994 downloads)
A monospaced typeface suitable for technical texts and/or programming. BPmono and BPmono Bold are manually hinted from 9px to 16px making it appropriate for use in various advanced text and programming editors (eg. Visual Studio .net, Visual Web Developer, MS Word etc). All three fonts are available in TTF format.
Tip: A monospaced font should always be aligned left (or right, at worst) and never justified or centered in order to remain actually monospaced.
Changes: BPmono Bold is introduced, while BPmono and BPmono Italics faced some glyph and hinting corrections (many thanks to Nick Tzanos for his help and suggestions).
Eu recomendo esta pois diferencia o zero do "O" maiúsculo:
http://fractal.csie.org/~eric/wiki/Terminus_font

Tem brinde :)
http://www.backpacker.gr/pages/fonts/fonts.asp
(Updated) BPmono (regular + italics + bold) | download (3994 downloads)
Tip: A monospaced font should always be aligned left (or right, at worst) and never justified or centered in order to remain actually monospaced.
Changes: BPmono Bold is introduced, while BPmono and BPmono Italics faced some glyph and hinting corrections (many thanks to Nick Tzanos for his help and suggestions).
Eu recomendo esta pois diferencia o zero do "O" maiúsculo:
http://fractal.csie.org/~eric/wiki/Terminus_font


Bateria a ar pode durar 10 vezes mais que baterias de lítio
 | A nova "bateria a ar" eleva em até 10 vezes a capacidade de armazenamento de energia em comparação com as baterias atuais e poderá ser mais barata, já que substitui o óxido de lítio por uma estrutura de carbono. |

alias para desktop
echo "alias cdesk=\"cd ${HOME}/Desktop\"" >> ~/.bashrc
Agora pode entrar no seu desktop assim:
cdesk
Vou tentar fazer um aliás que recebe um nome como parâmetro e
copia para o desktop
Buscar padrão em intervalo de linhas no vim
http://vimdoc.sourceforge.net/htmldoc/vimfaq.html
11.22. How do I search for a pattern within the specified range of lines
       in a buffer?

You can search for a pattern within a range of lines using the \%>l
and \%
For example, to search for the word 'white' between the lines 10 and 30 in
a buffer, you can use the following command:

    /white\%>10l\%<20l

For more information, read

    :help /\%l
Dose diária de nerdisse
http://www.linuxconfig.org/Vim_Tutorial
agora clique nas lindas setas amarelas :)
agora clique nas lindas setas amarelas :)
tema gelatin + tema de ícones discovery
Gelatin again

I updated parts of the Gelatin theme. It uses new scrollbars now, and the theme has less gradients. It looks simpler now.
The Metacity theme has different inactive titlebarborders.
Don't forget the Discovery Iconset.
E um monte de temas legais: http://kims-area.com/?q=node/8
Ferramenta em python para trabalhar com bibtex
http://www.pybliographer.org/
Screenshots neste link:
http://www.pybliographer.org/Documentation/Screenshots

apt-get install pybliographer
Screenshots neste link:
http://www.pybliographer.org/Documentation/Screenshots
The main window

The search window

Editing

File selection
Lista de plugins para o gedit
Todos sabem que sou um "vim lover" mas vou dar uma dica para quem gosta do gedit
http://simplesideias.com.br/lista-de-plugins-para-o-gedit/
http://simplesideias.com.br/lista-de-plugins-para-o-gedit/

Introdução ao Gnu/Linux by J.F.Mitre
http://jfmitre.com/2009/05/introducao-ao-gnulinux.html
Segundo o Autor J.F.Mitre é provavel que ele siga os mesmos moldes do nosso livro do vim
Segundo o Autor J.F.Mitre é provavel que ele siga os mesmos moldes do nosso livro do vim
Plugin find mate for vim
que tal um plugin para agilizar suas buscas?

Vocẽ tem apenas que digitar duas vezes vírgula "em modo normal para ele abrir a linha de comando com o padrão:
Para funcionar no windows você precisar ler um pouco de inglês :)

Vocẽ tem apenas que digitar duas vezes vírgula "em modo normal para ele abrir a linha de comando com o padrão:
:Findmate
Para funcionar no windows você precisar ler um pouco de inglês :)
http://gnuwin32.sourceforge.net/packages/findutils.htm

After you install it, make sure its directory appears in your %PATH%
before C:\WINDOWS\system32, or else Vim will probably run the original
Windows version.

I still couldn't get it to find my file, but this should be a good
start.  Now, I need to get back to my day job!

Good luck


Conhece a IDE pida?
Descobri esta IDE meio que por acaso, nas minhas pesquisas por "vim tips" no oráculo, me deparei com este texto:
Para ubuntu basta:
apt-get install pida
Referências:
"PIDA is an IDE (integrated development environment). PIDA is different from other IDEs in that it will use the tools you already have available rather than attempting to reinvent each one. PIDA is written in Python with the PyGTK toolkit, and although is designed to be used to program in any language, PIDA has fancy Python IDE features".Creio que valha a pena dar uma testada, quem já usou ou vier a usar pode comentar este post, eu agradeço de coração :)
Para ubuntu basta:
apt-get install pida
Referências:
- http://amix.dk/blog/viewEntry/46
- http://pida.co.uk/ site oficial
- http://pida.co.uk/doc/handbook.html handbook
Iniciando o vim em modo fullscreen
If you want to start in fullscreen mode add this to your vimrc:
source: http://amix.dk/blog/viewEntry/19403
if has("gui_running")
  set fuoptions=maxvert,maxhorz
  au GUIEnter * set fullscreen
endif

Assinar:
Postagens (Atom)
linux-cookbook
|
|
| Participe do grupo linux-cookbook |
| Visitar este grupo |